Perfect bacon comes down to two chemical processes that happen at very different temperatures: fat rendering, which works best between roughly 140 and 160°F, and the Maillard reaction, the browning that creates crispness and flavor, which needs temperatures above 300°F. The problem is that a hot pan tries to do both at once, scorching the meat before the fat has melted. Adding a splash of water at the start solves this elegantly: while water is present, the pan cannot exceed 212°F, so the fat renders gently first, and only after the water evaporates does the temperature climb high enough for crisping. America's Test Kitchen, whose test cooks champion this technique, sums up the payoff: bacon that is "tender and crisp, not dry and brittle."
The Science of Crispy Bacon: A Two-Stage Process
Animal fats like the streaks running through bacon melt at fairly low, but above-ambient, temperatures—generally in the 140–160°F range. The Maillard reaction, by contrast, kicks in well above 300°F. That gap between the two thresholds is where most bacon goes wrong. In a dry hot pan, the surface hits browning temperatures while the fat is still solid, so you get burnt edges clinging to chewy, under-rendered fat.
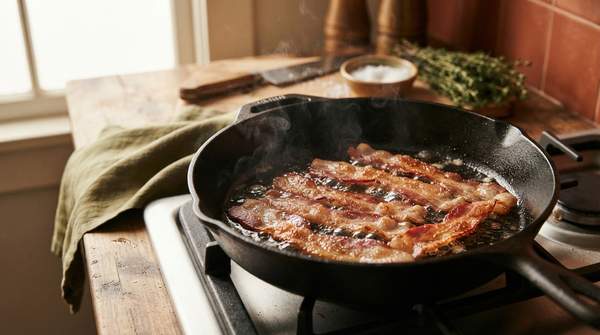
Water closes that gap by acting as a temperature regulator. Boiling water cannot exceed 212°F at sea level, so submerged bacon sits comfortably above the temperature needed to render fat but safely below the point where browning reactions take off. The water effectively poaches the bacon, melting the fat slowly while the meat cooks through and stays moist. Once the water boils off, the pan is left with a convenient layer of rendered fat, and the bacon finishes by frying in its own drippings.
The Two Stages of Crispy Bacon: An Explanatory Model
This model maps what happens in the pan to the chemistry driving it. Use it to anticipate each phase: while you see simmering water, rendering is underway; once the water is gone and the sizzle changes, crisping has begun.
| Cooking Stage | Pan Temperature | Primary Process | Result |
|---|---|---|---|
| Stage 1: Water simmering — bacon starts in a cold pan with water just covering the strips | Capped at 212°F (100°C) while water is present | Fat renders gently at 140–160°F while the meat retains moisture | Fat melts out into the pan; meat stays tender and cooked through, prepared for crisping without drying out |
| Stage 2: Water evaporation and frying — the transition happens naturally as the water boils off | Rises above 300°F once the water has fully evaporated | The Maillard reaction browns the bacon as it fries in its own rendered fat | Evenly browned, crisp surfaces; the prior rendering prevents scorching and ensures uniform crispness |
The key insight is that water doesn't cook the bacon so much as it sequences the cooking. It separates rendering from browning so each happens at its ideal temperature rather than both failing simultaneously.
Mastering the Water Method: Step-by-Step Guide
The method itself is remarkably simple. America's Test Kitchen's version calls for starting the bacon in a cold pan, adding about ¼ cup of water—just enough to cover it—then cooking over medium heat until the bacon is crisp-tender, flipping after the first side has crisped. Timing depends on the thickness of the bacon, and the technique works with strips or cut pieces of any thickness.
The chef behind the Andy Cooks recipe, who describes this as a home-kitchen trick he's used for years, lays out the same sequence with a few practical refinements:
- In a large, cold pan, lay streaky bacon out flat and add just enough water to cover it.
- Place the pan over high heat for 2–3 minutes to bring the water up.
- Stay close, drop the heat to medium, and flip the bacon 2 or 3 times for even color on both sides.
- Once the water has evaporated, let the bacon fry in its rendered fat until crisp.
- Drain on a paper towel-lined plate and serve.
His recipe clocks the whole process at about 20 minutes of cooking, and he recommends streaky bacon—visible fat is what renders and crisps—with dry-cured being the best option if your butcher has it, since its surface dries and crisps faster than wet-cured supermarket bacon.
Why the Water Method Works: Temperature Control and Texture
The counterintuitive part—water meeting what will become hot fat—is what makes most cooks skeptical. Lindsay Parrill, writing for Taste of Home after testing the technique, admits that most of us have absorbed the rule that water and hot fat should never meet, but found the method produced the most evenly cooked strips she'd made, slowing things down enough to let bacon cook gently and evenly.
The texture advantage comes from the two distinct temperature phases. America's Test Kitchen explains that the water keeps the initial cooking low and gentle, so the meat retains moisture and stays tender as the fat renders. By the time the water evaporates, much of the fat has already melted out, which means you never risk burning the bacon while waiting for enough fat to cook off, as happens with the traditional dry method. The result is the dual texture that's so hard to achieve otherwise: shatteringly crisp edges with meat that hasn't been cooked into jerky.
Troubleshooting Common Bacon Problems
Once you understand the two-stage model, most bacon failures become diagnosable. Each problem below traces back to the rendering and browning phases getting tangled together.
- Bacon is chewy and fatty, never crisping: The fat never fully rendered before browning began—exactly what happens when bacon hits a hot dry pan. The fix is the water method itself: the simmering phase melts the fat at 140–160°F before any high heat arrives.
- Burnt spots next to raw, pale patches: Uneven pan heat plus no temperature buffer scorched thin areas while thick fat pockets stayed solid. Starting cold, using a large pan with strips laid flat, and flipping 2–3 times during cooking evens out both heat and color.
- Dry, brittle bacon: The meat lost its moisture before the fat finished rendering. The water phase prevents this by keeping the lean poached and tender while the fat melts, so don't rush it—let the water do its work before the frying begins.
- Splatter everywhere: A common complaint with dry frying. The water phase keeps temperatures moderate until the fat has rendered gradually, which tames the violent spitting of fat hitting high heat.
One storage note from the Andy Cooks recipe: cooked bacon keeps in an airtight container in the fridge for up to 4 days, and reheats best in a hot dry pan for 30 seconds per side—skip the microwave, which turns the texture leathery.
Achieving Perfect Bacon: Your Next Steps
To consistently cook perfectly crispy and tender bacon, always start with a cold pan and add enough water to just cover the bacon, allowing the fat to render gently before browning. The measurable indicator that the method is working is unmistakable: the water will evaporate, and the bacon will begin to sizzle and brown evenly, marking the transition from fat rendering to the Maillard reaction. Watch for that moment, flip a couple of times as the strips fry in their own fat, and pull them when the color is uniform—tender meat beneath a crisp, mahogany shell, every single time.